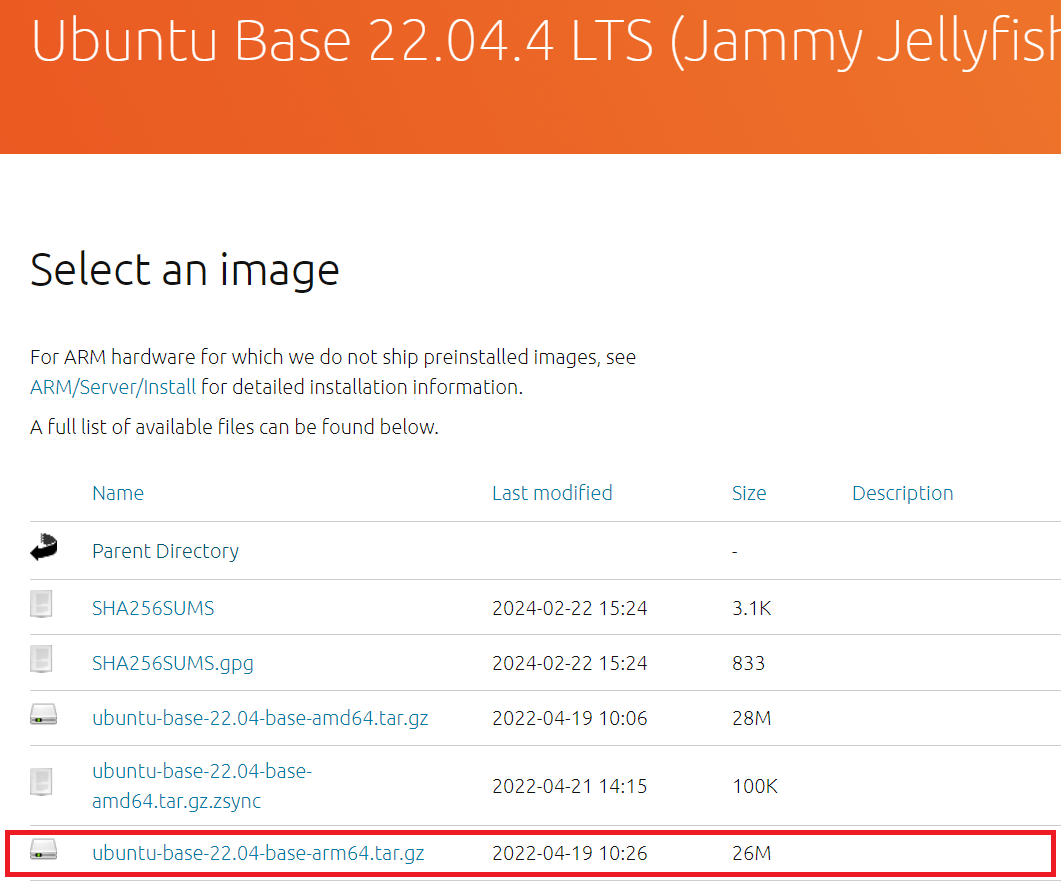
ARM aarch64 System에서 Ubuntu 22.04 Base Rootfs 작업을 위해서는 하기와 같은 작업을 통해 진행해야 한다.
작업을 할 Host PC에는 Qemu 명령이 설치 되어 있어야 하고 없다면 하기 명령을 통해 미리 설치해준다.
sudo apt update -y
sudo apt install -y qemu-user-static qemu-aarch64-static
Ubuntu-Base 22.04 등의 Release 버전은 하기의 링크에서 다운로드가 가능하다.
https://cdimage.ubuntu.com/ubuntu-base/releases/
Index of /ubuntu-base/releases
cdimage.ubuntu.com

위의 해당 사이트를 통해 'ubuntu-base-22.04-base-amd64.tar.gz' 를 다운로드 한 것을 가정으로 작업 방법에 대해 설명한다.
다운로드 이후 하기의 명령과 같이 ubuntu_base 디렉토리를 생성 후 압축 파일을 해제하여 작업할 영역을 생성해준다.
chroot 명령을 통해 aarch64 시스템을 사용해야 하기 때문에 'qemu-aarch64-static' 또한 root filesystem의 bin 안에 qemu-aarch64-static을 복사해준다.
mkdir -p ./ubuntu_base
tar zxvf ubuntu-base-22.04-base-amd64.tar.gz -C ubuntu_base
sudo cp /usr/bin/qemu-aarch64-static ./ubuntu_base/bin/qemu-aarch64-static
ubuntu_base Filesystem이 생성되면 작업 시 사용할 proc 및 sysfs 등을 mount 해주어야 하는데 하기의 스크립트를 통해
chroot 이전에 mount/umount 작업을 진행할 수 있도록 준비한다.
#mnt_ubuntu.sh
#!/bin/bash
mnt() {
    echo "MOUNTING"
    sudo mount -t proc /proc ${2}proc
    sudo mount -t sysfs /sys ${2}sys
    sudo mount -o bind /dev ${2}dev
    sudo mount -o bind /dev/pts ${2}dev/pts
    sudo chroot ${2}
}
umnt() {
    echo "UNMOUNTING"
    sudo umount ${2}proc
    sudo umount ${2}sys
    sudo umount ${2}dev/pts
    sudo umount ${2}dev
}

if [ "$1" == "-m" ] && [ -n "$2" ] ;
then
    mnt $1 $2
elif [ "$1" == "-u" ] && [ -n "$2" ];
then
    umnt $1 $2
else
    echo ""
    echo "Either 1'st, 2'nd or both parameters were missing"
    echo ""
    echo "1'st parameter can be one of these: -m(mount) OR -u(umount)"
    echo "2'nd parameter is the full path of rootfs directory(with trailing '/')"
    echo ""
    echo "For example: ch-mount -m /media/sdcard/"
    echo ""
    echo 1st parameter : ${1}
    echo 2nd parameter : ${2}
fi
위의 스크립트 실행 방법은 './mnt_ubuntu.sh -m ./ubuntu_base' './mnt_ubuntu.sh -u ./ubuntu_base' 와 같이 작업 시작 전에 '-m' 을 통해 mount 후 작업 완료 시 '-u'를 통해 umount 작업을 진행한다.
ubuntu base 작업 이전에 dns 등 network 환경을 잡아주기 위하여 하기와 같이 resolv.conf를 복사해준다.
cp -vrfp /etc/resolv.conf ubuntu_base/etc/resolv.conf
또는 하기와 같이 nameserver를 8.8.8.8로 설정하여 google nameserver를 활용한다.

위와 같은 네트워크 환경까지 준비가 되면 하기의 명령을 통해 chroot을 진행하여 filesystem 작업을 진행한다.
chmod a+x mnt_ubuntu.sh
./mnt_ubuntu.sh -m ubuntu_base/
해당 명령을 진행하면 ubuntu_base 디렉토리를 기준으로 chroot가 진행되어야 한다.
정상적으로 전환이 완료되었다면 하기와 같은 필수 유틸을 설치하고 필요한 명령 및 패키지가 있다면 apt를 통해 설치를 해준다.
chmod 777 /tmp
apt update -y
apt install -y systemd
apt install -y vim htop
apt install -y net-tools ethtool ifupdown udhcpc ssh iputils-ping rsyslog
이와 더불어 추가적으로 ttyS0 등의 getty 로그인이 필요하다면 하기의 내용을 토대로
'./etc/systemd/system/getty.target.wants/getty@ttyS0.service' 경로에 파일을 추가해준다.
#  SPDX-License-Identifier: LGPL-2.1-or-later
#
#  This file is part of systemd.
#
#  systemd is free software; you can redistribute it and/or modify it
#  under the terms of the GNU Lesser General Public License as published by
#  the Free Software Foundation; either version 2.1 of the License, or
#  (at your option) any later version.

[Unit]
Description=Getty on %I
Documentation=man:agetty(8) man:systemd-getty-generator(8)
Documentation=http://0pointer.de/blog/projects/serial-console.html
After=systemd-user-sessions.service plymouth-quit-wait.service getty-pre.target
After=rc-local.service

# If additional gettys are spawned during boot then we should make
# sure that this is synchronized before getty.target, even though
# getty.target didn't actually pull it in.
Before=getty.target
IgnoreOnIsolate=yes

# IgnoreOnIsolate causes issues with sulogin, if someone isolates
# rescue.target or starts rescue.service from multi-user.target or
# graphical.target.
Conflicts=rescue.service
Before=rescue.service

# On systems without virtual consoles, don't start any getty. Note
# that serial gettys are covered by serial-getty@.service, not this
# unit.
ConditionPathExists=/dev/tty0

[Service]
# the VT is cleared by TTYVTDisallocate
# The '-o' option value tells agetty to replace 'login' arguments with an
# option to preserve environment (-p), followed by '--' for safety, and then
# the entered username.
ExecStart=-/sbin/agetty -o '-p -- \\u' --noclear %I $TERM
Type=idle
Restart=always
RestartSec=0
UtmpIdentifier=%I
TTYPath=/dev/%I
TTYReset=yes
TTYVHangup=yes
TTYVTDisallocate=yes
IgnoreSIGPIPE=no
SendSIGHUP=yes

# Unset locale for the console getty since the console has problems
# displaying some internationalized messages.
UnsetEnvironment=LANG LANGUAGE LC_CTYPE LC_NUMERIC LC_TIME LC_COLLATE LC_MONETARY LC_MESSAGES LC_PAPER LC_NAME LC_ADDRESS LC_TELEPHONE LC_MEASUREMENT LC_IDENTIFICATION

[Install]
WantedBy=getty.target
DefaultInstance=ttyS0
위 과정이 완료되면, 하기와 같이 'exit' 명령을 통해 chroot를 종료한다. 그 후 이전에 mount 한 proc 등 sysfs 를 스크립트를 실행하여 종료한다.
./mnt_ubuntu.sh -u ubuntu_base/
또한, 사용할 이미지에 이미 넣어두었던 qemu 파일을 aarch64 시스템에서는 필요하지 않으므로 삭제해준다.
rm -rf ./ubuntu_base/bin/qemu-aarch64-static
해당 작업이 완료되었다면 다시 ubuntu_base 디렉토리로 이동하여 '/' 경로에서 압축을 진행해주어 파일시스템 만드는 것을 완료한다.
cd ubuntu_base
tar zcvf ubuntu_base.tar.gz *
mv ubuntu_base.tar.gz ../
cd -